

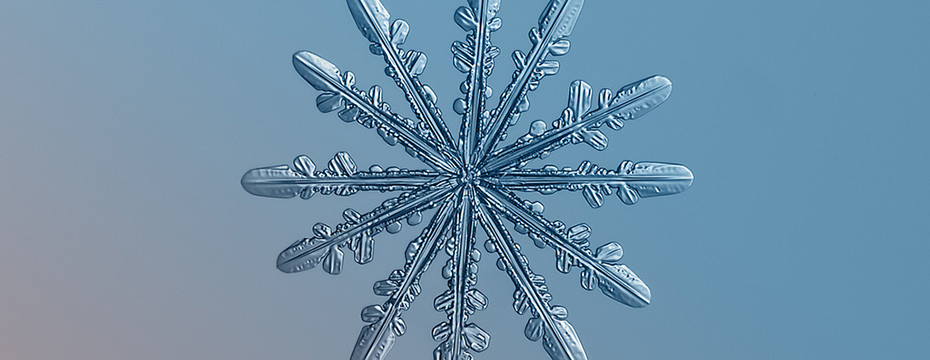
Snowflake Photography
Russian photographer Alexey Kljatov certainly knows a lot about snow. Most Russian photographers likely do, as the brutal winter months of their homeland provides plenty of first hand experience. But how many of them have taken the time to learn how to photograph an individual snowflake? Certainly not many. There aren’t a lot of people I know of in the world doing macro snowflake photography. It’s a shame, as it is another one of the marvelous wonders of nature that make for beautiful photographs.

How To Build Your Own Macro Camera Setup
For Alexey’s snowflake photography effort, he first had to construct a macro lens setup, as his camera is an old Canon Powershot A650. In the latest incarnation, the A650 is sporting the addition of a Helios 44M-5 50mm f/2 lens added from an old Soviet era USSR SLR camera called a Zenit. This combination provides the extra macro magnification necessary to isolate the individual snowflakes. Total camera cost – not much. A quick check on E-bay shows the Helios offered at $29-$65, and the Canon Powershot A650 with a Buy It Now of $125. Amazing that all of the fantastic images below by Alexey Kljatov were created with this rig; an under $200 investment!
Alexey’s own words on his custom construction for snowflake photography:
“At first, I attached these lens at narrow wooden board (around 30 cm long), reversed: a back lens to snowflake, front lens to camera, and drilled in a board an opening for a screw suitable to tripod nest of the camera. Then camera is put on a board so that the lens in the maximum optical zoom mode (6x) touched Helios lens and looked straight into them. I attach the camera by a screw and additionally with metallic bracket, glued to the board, it holds opposite side of camera, so it didn’t move anywhere. On Helios’s back side (which is front of whole construction) i attached three standard narrow extension rings from Zenit camera (this is needed only in case of shooting at glass surface with backlight). This holds lens at needed focusing distance from the glass with snowflakes (2,5-3 centimeters). Place of connection between internal and external lens I covered with some sort of skirt, maked from black plastic bag: this protects connection point from outer light, snow, ice and waterdrops. All design turned out rather strong and steadily stands vertically with lenses looking down. I simply put it on glass over the chosen snowflake and shoot at maximum optical zoom instead of macro mode. Camera’s autofocus works well.”
This is the assembled construction:

The Camera/Lens Combination. duck taped together on a supporting wooden board. <$200.

Front view of the camera and of the attached macro lens.

Camera & Lens setup and ready for use.
There is no doubt from the images below that Alexey is absolutely correct, the setup does work quite well indeed!


Macro Snowflake Photography. Beautiful, unusual, and amazing stuff!
Source for these images and many others, used here with permission: http://www.flickr.com/photos/chaoticmind75/
Alexey Kljatov’s Blogspot with original story: http://chaoticmind75.blogspot.ru/2013/08/my-technique-for-snowflakes-shooting.html
PLEASE RATE THIS STORY! [ratings]


Magnet
Wow! That is some serious work there! Thank you for sharing!
Suzanne Birrell
These are AMAZING!