When Size Matters
By Jim Quinn
With some photo subjects, extending the frame to the left or right, or even up or down, can work far better than the usual 3×2 format that photographers have been dealing with since the earliest Leicas. And with the Sweep Panorama feature in Sony cameras, and similar features offered by some competitors, breaking out of those rigid rectangles is easier than ever.
But with the exception of Sony’s new SLT-A99, that technology hasn’t made its way into Old School DSLRs, at least not yet. If your favorite camera doesn’t share that feature, don’t despair. Photoshop’s Photomerge will treat you well.

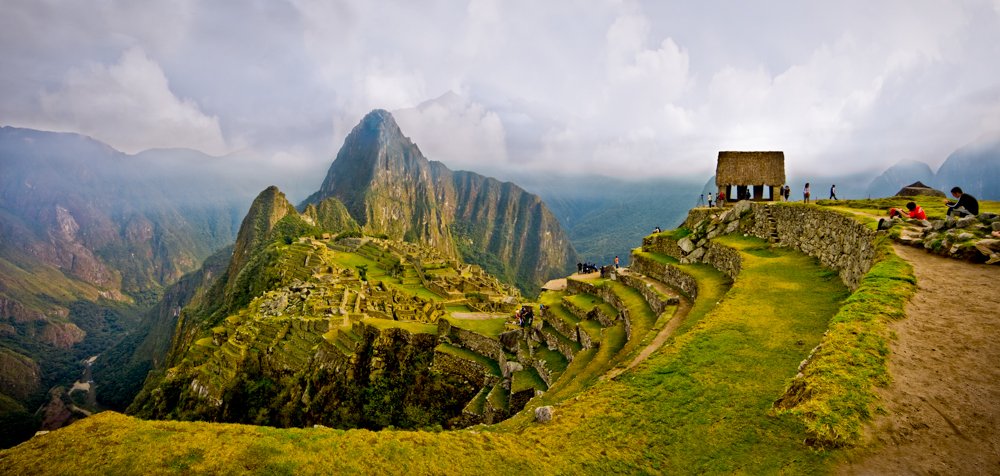
Machu Picchu Panorama: Eight photos (Canon DSLR)
With your camera in hand, face the scene and decide where your panorama should begin and end. Choose the lens, or the zoom lens setting, that allows you to include any buildings, landmarks, or other important vertical elements, and any preferred foreground, when the camera is rotated vertically. Yes, that’s right; I suggest you make horizontal panoramas using a series of portrait-mode pictures. By taking several more photos than you would if you held your camera horizontally, you raise the overall resolution of the panorama, increasing the sharpness of its details.
To begin, set your camera to an automatic mode and take a shot of the most important part of the scene. That’s your metering shot. If it looks good, read the camera’s settings – and then start turning things off.

Peru Sunset Panorama (Cordillera Negra mountains near Huaraz, Peru): Eight photos (Canon DSLR)
First, set the lens to manual focus and make sure the scene is sharp. Change the camera to its manual setting and adjust the lens opening and shutter speed to match the metering shot. Finally, switch the camera’s White Balance to the most appropriate setting – Daylight, Shade, Tungsten, or whatever. With all those settings locked in, each frame in the panorama should match the others.
You may think you need to anchor your camera to a level tripod to make a panorama. That’s good advice, but unless you’re shooting in a low-light setting, feel free to ignore it. I’ve gotten good results time after time, handheld.

Yangshuo Panorama (Guangxi, China): Sixteen photos (Canon DSLR)
When you’re ready, stand in a stable position, rotate your camera vertically, and turn your upper body to face the left side of the scene. Take a practice swing or two, like a golfer warming up, to make sure you can take all the frames without interference. Try to keep your swing as level as possible. Take the first frame, then swivel to the right until the next frame overlaps the first by at least 25 percent. Proceed with the remaining frames, overlapping as evenly as you can with each frame. It’s okay to be conservative; too much overlapping won’t hurt. A typical panorama series might produce from four to ten photos, though I’ve made 16-shot panoramas that work very well. When you finish, repeat the series at least once for insurance.

Lake Michigan Panorama (Holland, Michigan): Nine photos (Canon G9)
Load the photos into a new folder on your computer, but don’t adjust them at this point. Instead, open your best series in Photoshop, then go to the toolbar and choose File>Automate>Photomerge. The menu box that appears has a series of settings on the left; I’d suggest choosing Auto. When you select “Add Open Files,” the names of the files you selected will appear in the box in the center of the menu (you can also open them directly from a folder by choosing Browse and locating your series in its folder). Select “Blend Images Together” and hit Okay. Photomerge goes to work.

Irish Panorama (Westport, Ireland): Seven photos (Canon DSLR)
Depending on the speed of your computer and the size of your final image, it may take several minutes before your completed panorama appears. When you first see it, don’t be disappointed! If you used a normal lens or a medium telephoto to shoot the individual frames, you may see little distortion, but if you used a wide-angle lens, Photomerge may deliver a wildly non-rectangular result that will require some editing. If you have shot your fragments handheld, the merged photo may not have perfectly level top or bottom edges, and you may see an extreme keystoning effect. But there are simple fixes for those problems, so if you’re generally happy with the merge, flatten the layers and close the individual photos, too; you won’t need them again. Then SAVE THE FILE!

Na Pali Panorama (Kalalu Valley, Na Pali Coast State Park, Kaua’i, Hawaii): Eight photos (Canon DSLR)
You can crop the new panorama to remove any uneven edges. If the left and right edges aren’t vertical, you can check the crop tool’s Perspective box and drag the upper corners of your cropping box left and right, offsetting the keystone effect. Hit Return to view the result. If your first crop hasn’t corrected the problem, undo it and try again. If you need to clone in an area of sky or foreground, create a new cloning layer first.

Pritzker Pieces & Pan (Frank Gehry-designed Pritzker Pavilion, Millennium Park, Chicago): Eight photos (Canon G1X)
Once you have made the corrections to insure proper alignment and even edges, save the file again. It’s now ready for color correcting and the other steps in your normal photo workflow.
You probably won’t choose to make panoramas every day, but it’s good to know how easy it is to make one when you want to – even if you aren’t using a camera with the latest panoramic features built in.
PLEASE RATE THIS STORY! [ratings]