
Part two of the BRONICAsaurus tilt-shift series. The first piece built the rig. This one takes it apart ” effective focal length, the real image circle, the tilt budget ” and uses the most-painted church in America to show what all that geometry is actually for.

The Pack
The San Francisco de Asís Mission Church at Ranchos de Taos is, by a wide margin, the most photographed building in New Mexico, and it has a fair claim to being the most painted church in the United States. Georgia O’Keeffe made a whole series of it starting in 1930. Ansel Adams photographed it that same year. So did Paul Strand, who was staying in Taos with the same friend, Mabel Dodge Luhan, at the same time. Before any of them, William Henry Jackson had aimed a camera at the facade around 1881. The Taos Society of Artists worked it over. R.C. Gorman, Fritz Scholder, Laura Gilpin, Gustave Baumann, Ernest Blumenschein, the list runs to a who’s who and then keeps going. O’Keeffe said that most artists who spend time in Taos have to paint it, the way they have to paint a self-portrait.
So there is a pack. It is thousands of frames deep, and it grows by the hour. And here is the thing about that pack: it is mostly the back of the church. The sculptural adobe buttresses of the apse, the great mud-and-straw beehive forms that Adams and O’Keeffe made into the canonical image. Stand on the plaza on any afternoon and you will queue up behind someone making that same photograph for the ten-thousandth time.
This article is about a frame that is not in the pack. It is the front of the church, not the buttressed back. The two bell towers, the ground-level cross, phlox at my feet, and a storm cell stacked up behind the whole thing. And the reason it doesn’t look like the other ten thousand has nothing to do with a filter, a preset, or a lucky sunset. It has to do with a 1976 lens, a 2022 adapter, a 2021 body, and about ten degrees of tilt.
Part one built the rig. This one takes it apart.
The Rig, in One Sentence
For anyone arriving here first: the rig is a Schneider Zenzanon PCS Super Angulon 55mm f/4.5, a perspective-control lens built for the Bronica ETR medium-format system in 1976, mounted to a Fujifilm GFX100S locked down on a sturdy medium format grade tripod, through a Fotodiox RhinoCam Vertex rotating stitching adapter. You walk the 44mm x 33mm sensor across the lens’s image circle, shoot a handful of frames, and stitch them into a single composite. The full build, the costs, and the case for it over Fuji’s $4,000 native 30mm T/S all live in part one. The principles of perspective-control glass are in the original BRONICAsaurus piece.
Everything below is the part I left on the cutting room floor the first time: the numbers.
The Focal Length Nobody Calculates
When I posted part one, somebody reasonable asked the obvious question I had never bothered to answer: what is the effective focal length of a four-frame rotational stitch? What are you actually seeing?
Start with one frame. A single GFX100S exposure through the 55mm covers the sensor’s 44mm x 33mm, which works out to a 53-degree diagonal angle of view. On full-frame-35mm-equivalent terms, the language everybody still thinks in, that is a 43mm lens. A wide-normal. Nothing exotic. (Pleasant coincidence: the GFX sensor’s diagonal is almost exactly 55mm, so the 0.79 crop factor lands the 55mm right on 43mm equivalent.)
Now stitch four of them. The composite reaches a 56mm x 41.5mm frame, and the math changes:
- Horizontal angle of view: about 54 degrees or roughly a 35mm-equivalent lens
- Vertical: about 41 degrees or roughly 32mm
- Diagonal: 64.7 degrees or roughly 34mm
So the four-frame stitch gives you the field of view of a 34mm lens on full frame. Honest answer to the honest question.
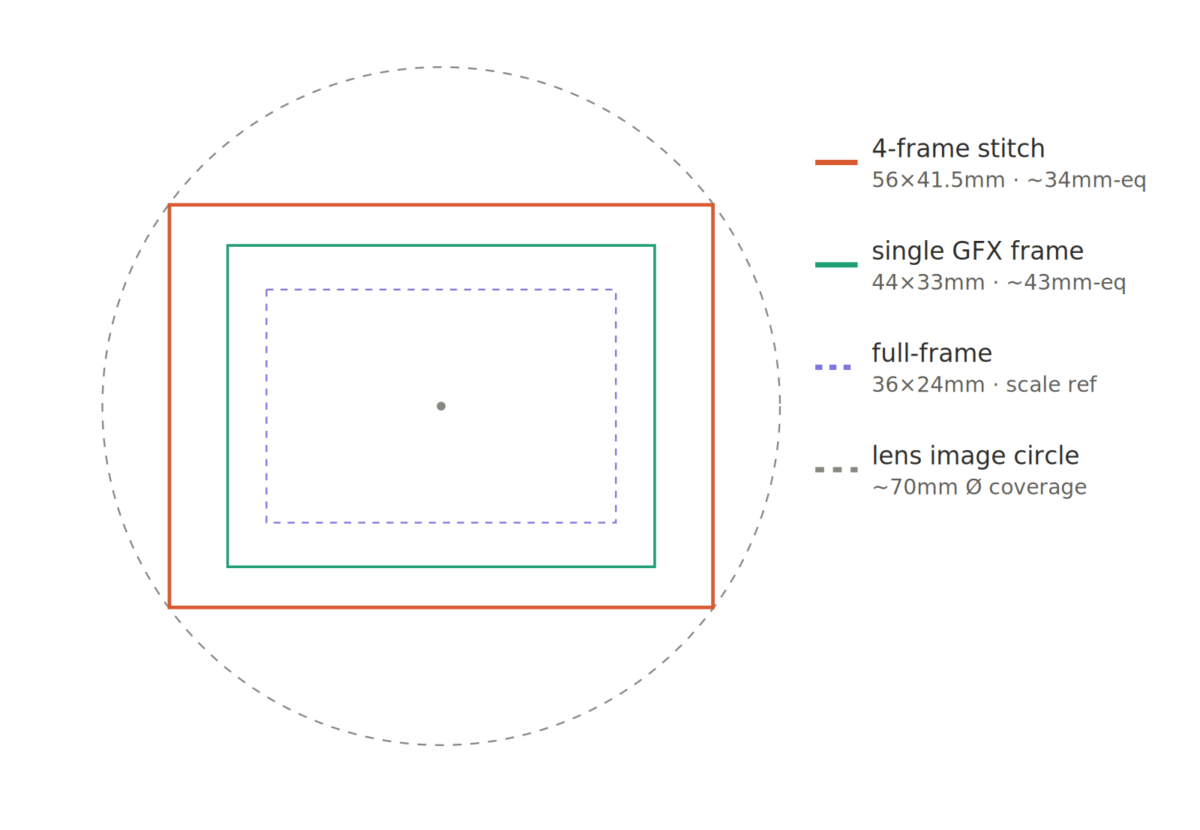
But here is what the equivalent-focal-length number hides, and it is the whole point. That 64.7-degree diagonal on the composite is not a coincidence. It is, almost exactly, the 64-degree angle of view this lens was designed to throw across a 6 x 4.5 film frame in 1976. The stitch is not inventing a wider view. It is reconstructing the full medium-format image circle the Schneider was built to cover back in the film days on a 645 format body. The coverage a single GFX sensor, smaller than the lens’s native format, only crops the center out of. In point of fact, I am walking the sensor back out to the edges of the lens’s real picture.
Which means the unique thing about that Mission frame was never the angle. Thirty-four millimeters is a moderate wide. Plenty of single lenses go wider, and nobody is impressed by 34mm. The unique thing is everything stacked behind the angle: that field of view delivered at 645-format resolution gives me 200 to 400 megapixels of composite, depending on overlap, with the verticals held dead straight due to the flat field stitching. No single lens at any focal length does all three of those at once. That is the difference you are looking at, even if your eye reads it only as “somehow this one feels bigger, wider.”
I Got the Image Circle Wrong
In part one I described this lens as throwing a 56 x 41.5mm image circle. I need to correct that, because the correction is not a footnote. It is the load-bearing fact of this entire article.
Fifty-six by forty-one-and-a-half is a rectangle, not a circle, and it is the working area of the clean 6 x 4.5 frame I reconstruct. It is not the lens’s actual coverage. Schneider’s own documentation puts the image circle on this lens at 104mm in diameter. That is a different animal entirely.
And the big number is the correct one, because the lens cannot do what it is rated to do without it. The Schneider’s specifications call for 12mm of lateral shift in either direction. You cannot shift a 70mm-diagonal frame by 12mm off-center and still cover the corners unless the circle is at least 94mm across. The 104mm spec is not Schneider showing off. It is the minimum the lens’s own movements require. The glass was built to throw a much bigger circle than I was giving it credit for.
This matters because every movement you make using shift, rise, tilt all spends on that circle. And once you know how big the circle really is, the limits of the rig stop being guesses and start being arithmetic.
The Movement Budget: One Circle, Shared
Think of the 104mm image circle as a fuel tank, and shift and tilt as two ways to burn the fuel in it.
Shift is the easy one to reason about, because it is linear. The GFX sensor’s half-diagonal is 27.4mm. Drop that inside a 104mm circle (52mm radius) and you have roughly 24mm of radial room before a corner runs off the edge. The lens’s own shift mechanism only travels 12mm, so comfortably inside that shift capability which is exactly why the RhinoCam matters: by rotating the body around a fixed lens position, the adapter walks the sensor further across the circle than the lens alone ever could. That is the stitch.
Tilt is the one that surprised me, and it sends me back to correct my own math from a conversation that fed this piece. The Schneider’s documented mechanical tilt range is 10 degrees up and 10 degrees down about the horizontal axis, and that figure holds across every variant, the original E, the later PE, and the Rollei-branded HFT. Now: with the real 104mm circle, a centered GFX sensor’s corners sit about 17 degrees inside the edge of the cone. Ten degrees of tilt only spends about half of that. So the lens runs out of mechanical tilt long before you hit the physical detent at 10 degrees, so long before tilt alone would run a centered sensor off the optical edge.
The detent wins. At or near center, you have the full ten degrees, and the image circle never even gets close.
The catch is that the two fuels share one tank. When you are stitching, the RhinoCam has already walked the sensor well off-center, and the Vertex swings a corner out on an arc as it rotates. You are burning circle before you ever touch the tilt. Stack ten degrees of tilt onto an aggressively shifted frame and the most off-center frame in the set can clip the circle even though a centered one wouldn’t. In part one I showed a “proof frame,” DSCF8362, with heavy dark crescents in the corners and a hard brown band across the top, and called it the signature of the rig working. Now I can name it precisely: that frame is the fingerprint of tilt at the mechanical maximum combined with shift for the stitch. The brown band is the literal edge of the image circle, reached because two movements were spending it at once.
What a Full-Frame Body Would Change
People ask whether they could do this on a body they already own, say a Sony A7RV instead of buying into medium format. The answer is a clean and slightly counterintuitive yes, with a catch, and it is worth showing because it reveals what the GFX is actually buying you here.
The trick is that the GFX100S and the A7RV have essentially the same pixel pitch at about 3.76 microns on both. Same lens, same pixel density. So the full stitch reaches the same field of view and the same final resolution on either body. What changes is the number of frames it takes to get there.
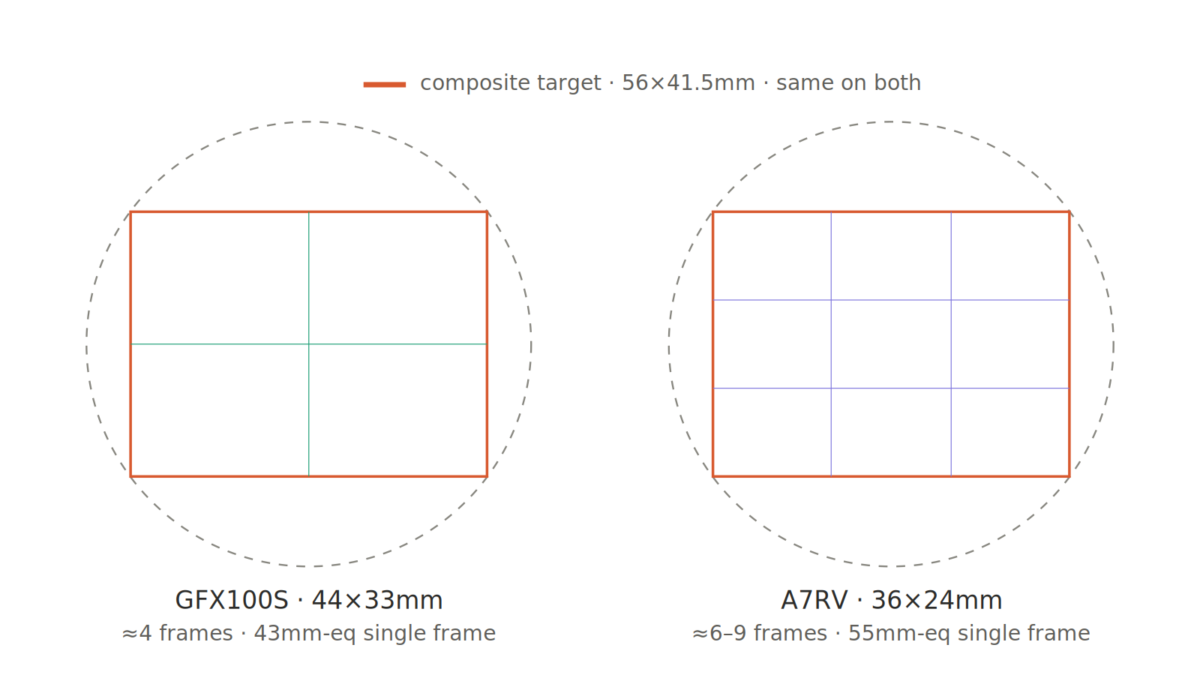
A single A7RV frame is narrower than a single GFX frame so on full frame the 55mm is simply a 55mm, a normal lens, versus the GFX’s wide-normal 43mm-equivalent. To cover the same composite you take roughly nine frames instead of four: twice the captures, twice the stitching labor, more seams, and a longer total capture window. That last one bit me into being careful that my four frames went down in twelve seconds at 1/1000 specifically so the storm cell wouldn’t drift between exposures. Double the frame count and you reopen that risk and make it a positive certainty of anything in your subject is moving around while you capture and move your camera nine times.
What the smaller sensor gains is movement room. Sitting deeper inside the 104mm circle, the A7RV has nearly double the shift latitude before vignetting. For single-frame perspective control without stitching, the full-frame body actually has more room to work.
So the GFX’s advantage in this rig is not pixels-on-target. The pixel pitch is identical; the final image is the same. The advantage is workflow speed, getting the same medium-format result in four frames instead of nine. That is worth knowing before you spend the money.
Ten Degrees, and What They Were For
Back to the Mission, because this is where the geometry stops being trivia and becomes a photograph.
That frame was tilted to nearly the full ten degrees. Not to correct anything but to bring the phlox at my feet into sharp focus while the bell towers and the entire storm cell behind them stayed sharp too. That is the Scheimpflug principle doing its job, and the numbers say exactly what ten degrees buys.
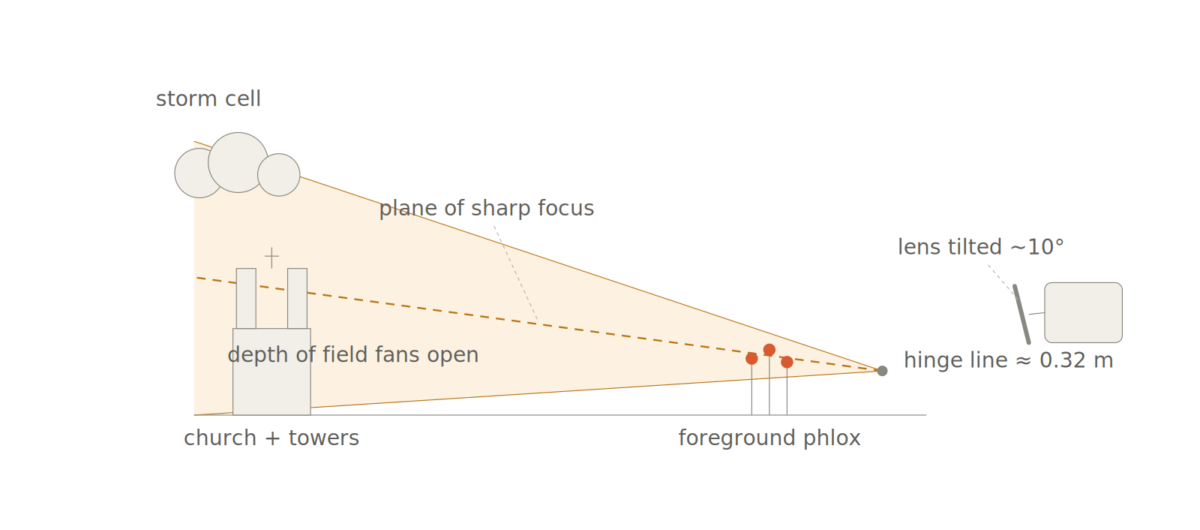
At 55mm, the hinge distance = f ÷ sin(tilt) = 55 ÷ sin(10°) = 55 ÷ 0.1736 ≈ 317mm. About thirteen inches in front of the lens. The plane of sharp focus pivots about that hinge line, swinging down low and near to lie along the ground, and then the depth-of-field wedge opens out with distance narrow at your feet, wide by the time it reaches the towers and the clouds. Flowers and storm cell, both crisp, in one focal plane.
Ten degrees is a lot of tilt for a 55mm. Most landscape work lives at two to four. Needing nearly the full range tells you the foreground was very close and very low with the phlox right at my feet, camera down near the dirt. And it tells you something less comfortable: in that frame, I had no tilt left. I was against the mechanical stop. Any closer or lower a foreground and the lens simply had no more tilt to give; I would have been forced to stop down and pay the diffraction tax on 102 megapixels, or focus-stack on a moving sky. Neither was on the table.
Here is the elegant part, and the reason verticals and focus don’t fight each other. Lens tilt only swings the focus plane. It does not converge verticals, as the perspective is set by the sensor plane and the viewpoint, not the lens. So while ten degrees of tilt was managing focus, the rise was lifting the towers into the frame, and the flat-stitch method was holding every vertical dead straight. Scheimpflug for the depth, rise for the framing, two independent axes, one exposure.
That is the move the rest of the pack cannot make from the same spot. A photographer standing where I stood with a fixed wide lens has to choose. Tilt the camera up to fit the towers and the upper cloud, and accept walls that converge like a funnel. Or shoot level and lose the top half of the storm. Or stop the lens all the way down to drag the foreground into focus, and watch the whole image go soft from diffraction. Every one of those is a compromise the tool forces on you. This rig’s entire reason for existing is to refuse the compromise.
Why It’s Different
Here is what I think is really going on with the most-photographed subjects in the world, the churches and the canyons and the lighthouses that everyone shoots and that all come out looking the same.
They look the same because the tools impose the same compromises. A single lens, however good, makes you choose between the foreground and the sky, between straight walls and the full height, between depth of field and diffraction. Ten thousand photographers making the same three trade-offs in the same light will produce ten thousand versions of the same frame. The sameness isn’t a failure of seeing. It is the equipment quietly voting.
Take the compromise away and the seeing comes through. The 1976 Schneider, the 2022 RhinoCam, the 2021 Fuji all stacked together, they are not really about resolution. They are about being able to put the whole scene I actually saw onto one frame without surrendering any part of it to the limits of a single piece of glass. That is why the Mission frame isn’t in the pack. Not because the gear is rare, though it is. Because the gear let me stop negotiating with the lens and start composing.
It is slow. It is heavy. It is twenty minutes of work for one finished stitch, and you have read me say in part one that for a working architectural photographer on a clock the native Fuji lens pays for itself in time saved. All true. But for the landscape photographer who has stood in front of an over-photographed subject and felt the tool deciding the picture before the eye got a vote, this is the way out. The slowness is not a tax. It is the part where you get to think. To compose. To see, and then to express what your vision saw.
The pack will keep growing. That is fine. Every one of those photographers is honoring the building, as O’Keeffe herself said every painting did. But for me, I just wanted one frame of the front that was mine, and mine alone. Next story maybe I’ll tackle shooting the back of the church, and see how different I can make that look with this combo.
See also: Building Myself a GFX100S Tilt-Shift Rig (part one of this series), Perspective Correction: Meet The BRONICAsaurus for the principles, and Vizelex RhinoCam for the original sensor-stitching concept.
A note on the body, same as last time: I bought my GFX100S from Dave Gallagher at Capture Integration, and if you are seriously weighing medium format, call Dave and get to know him before you spend a dollar. Not an affiliate link. He has earned the recommendation. Tell him Chuck Jones from The Camera Forum sent you.
©2026 Charles Paul Jones. All Rights Reserved.
