Audio Recording For Still Photographers
Far more than most still photographers realize, the quality of the audio track in moving pictures is one of the most important storytelling techniques. Second only to moving the camera itself, the soundtrack can add just the right elements of “sonic movement” in all the right places, changing scenes, tones, and adjusting light to dark as effectively as a changing visual. Actually better in some cases, because audio unlike video can be “slipped into the background” without notice like a visual change would be.
As a particular type of music can influence or set the overall mood, well recorded spoken words go a long way to giving a video production “spit and polish.” Without great sound, I can’t have a great movie. Want to raise your own production values? Here are ten steps I try to follow, any one of which is guaranteed to improve your audio and raise your production values. Put all ten into practice and who knows, you may one day become famous for your incredible soundtracks.
1. You’ll never get good sound with the built-in camera microphone. Honestly, even the best of them suck. Built-in camera mics are for reference audio ONLY. Think of the internal audio on your clip as a “guide track” to show where to insert your real high quality audio you recorded externally.
2. If you plan to shoot a lot of video, it is dumb to ever consider buying any camera that won’t let you use external microphones. Many people capture audio separately, and syncing it later in post. Unless you are one of these fortunate people, you will be depending upon recording your audio right to your camera. Make sure you are not tying two hands behind your back, buy a camera with an external mic jack.
3. If you plan to shoot primarily “run and gun” style, you can probably get away with a small shotgun such as a RODE Videomic Pro mounted on the camera hot shoe. Do take care to try and stay within six feet of your audio source for optimum quality. Any longer run, you can either use a mic with a mini plug and connect it to the camera OR you can run the mic via an xlr cord to a separate small mixer. Small mixers like a JuicedLink or a Beachtek are far better rendering a cleaner audio capture while at the same time providing you with superior control over the whole process.
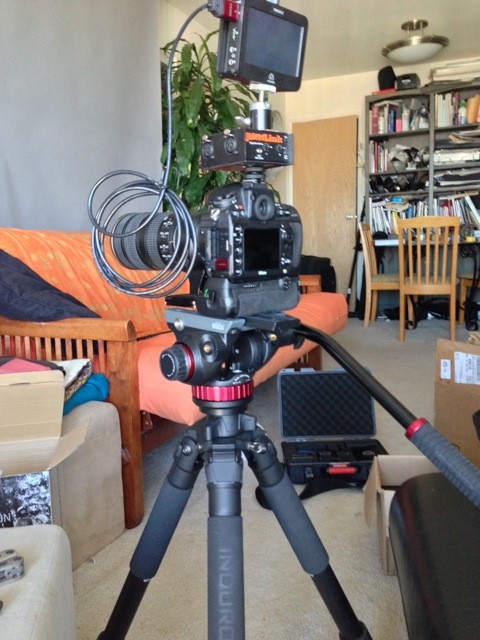
My Friend John Kraus Rigs His JuicedLink RM222 Riggy Micro Above His Camera – Photo©John Kraus – JohnKrausPhotography.com
4. In interviews situations, you don’t want your camera too close to your interview subject, so a camera mounted mic is out of the question. Try rigging a shotgun mic on a boom stand closer to the subject instead, and run the cord directly into your camera. If I plan to have a lav mic, shotgun and a small mixer, I run both into my camera using what is called a “pre-mix” or “sub mix” when possible. But do remember, once you mix two audio sources down, you can not go back and adjust the individual elements that make up the mix later.
5. Normally when using a DSLR camera, capturing the audio separately with a digital recorder is highly recommended. Not only do you get a lower noise floor in the external recorder (most in-camera preamplifiers for the audio are very noisy), but you also usually get a higher and cleaner digital data rate capture. In my poor man’s audio kit I use an H4N Zoom as the audio field recorder, but I also have the option to take the audio directly into my Atomos Ninja right along with the ProRes 422 video footage if I am using it on the shoot. The Zoom does have built in dual stereo mics in addition to two XLR inputs for far more audio recording options than any DSLR. I run an ambient shotgun mic and a wired mic into the two Zoom inputs, record the takes, and then sync the sound later in post with the in camera soundtrack using Plural Eyes. Make SURE you are recording the audio track in the camera as well to use as a reference for syncing later on.
6. When using devices like a Zoom with built in mics, even though they are good mics you need to get them close. You MUST get the mic in close to your sound as possible, or you will get some of that nasty “tin can” sound. I’m not a big fan of the Zoom’s built in mics for anything other than picking up ambiance and background B-Roll audio. More directional mics are usually my choice, so I can isolate audio just as I isolate subjects with lenses in my photography.
7. Use headphones. NEVER TRUST DSLR meters – they all lie. Wear headphones so you make sure that you are getting QUALITY sound. Remember, we are going to all of this extra trouble and expense to add production values. Don’t be foolish and go unprotected by leaving your headphones at home. Get a pair with the large comfortable ear cups too. Not only do you need to sound isolation they provide, your ears will thank you many times over for that extra padding.
8. Always record excellent quality audio. And remember, the audio for your b-roll is just as important as that captured with your A camera. Even if it is only destined for use as ambient background sound, the extra production values will be noticed. You will also be surprised at how nice it is to have great B-Roll audio to weave into the final edit.
9. I only use wireless systems when I absolutely must. In cities like Los Angeles where I live, finding a clean wireless frequency isn’t going to happen. Always go wired if possible, as wireless you are depending upon having a strong enough wireless signal to overpower the competing signals set to the same frequency you are trying to use. If you have no choice but using a wireless system, spend the extra money to rent first to test, then buy a system that has a good range. They are going to cost you from $800 to $4,000 a setup, but it is money invested in quality, quiet, natural sound.
10. Pick a good mic. Like the sensor in your camera, the quality of your microphone has a whole lot to do with the end quality of your movie. Cheap lenses and cheap microphones usually don’t have a place in my bag, unless used for specific effects. As with lenses, the good microphones will cost at least a couple hundred bucks. The $379 Sanken COS-11D, the current Hollywood “standard” is fantastic. I like it better than the old Hollywood standard, the $235 Tram TR-50. I haven’t used the $250 Rode Lavaliere, but it does sound promising. There are also good less expensive mics available from Que Audio and Sony I have used. Do bear in mind as you are shopping though as with good quality lenses, the price does usually indicate the overall quality level in a microphone as well. Plan to spend at least $200 for a good mic.
Rate this story! [ratings]


