Using Sony Wi-Fi with PlayMemories, PicTapGo & Instagram
Using Sony Wi-Fi with PlayMemories, PicTapGo, & Instagram –
How to Use Wi-FI on your Sony Mirrorless camera in conjunction with the Sony PlayMemories app, PicTapGo and Instagram on the iPhone
by
Paul F. Gero | paulfgero.com
Member, Sony Artisans of Imagery Program
One of the great things about Sony mirrorless cameras like the a7II, the a7, the a6000, and the a7s is that they are small, light and professional cameras.
And, one of the great bonus features to these cameras is that they are Wi-Fi enabled and thus I can use my little Sony mirrorless cameras to send photographs from my camera, to my iPhone 6+ and then up to the web, Facebook, Twitter or Instagram using the sweet iPhone app called “PicTapGo” by gettotallyrad.com.
I’ve been on Instagram for a few years but it’s only been recently that I have made consistent contributions to this growing social media platform
In the accompanying tutorial, I want to share with you exactly how I do that.
This has become my preferred method to upload to social networks over the past six weeks since getting this dialed in. I can count on one hand the number of images that I have worked on the big computer for upload in that time.
This technology would have been such a benefit to former news photographers like me who back in the day shot on film, often processed in a hotel and then made a print or later, scan negatives to get the images into print.
It was a time-consuming and labor-intensive process. The technology we have now is such a tremendous time saver by contrast.
It makes me truly appreciate the gift that Wi-Fi on the Sony cameras is.
The apps used are:
Sony PlayMemories app for iPhone — you can find that here:
https://itunes.apple.com/us/app/playmemories-mobile/id489191124?mt=8
For post production of images, I absolutely love PicTapGo; you can find that here:
https://itunes.apple.com/us/app/pictapgo/id585307861?mt=8
First things first: Make Sure Your Camera is Set up for the Play Memories App by going here:
Once you are here, you will be good to go to use PlayMemories to send photographs to your iPhone. (The Smart Remote Embedded is another very cool app and I can cover that in a future tutorial).
Step by Step Tutorial:
1. Make sure that Airplane Mode is OFF in your camera
2. Select the play key to edit the photographs

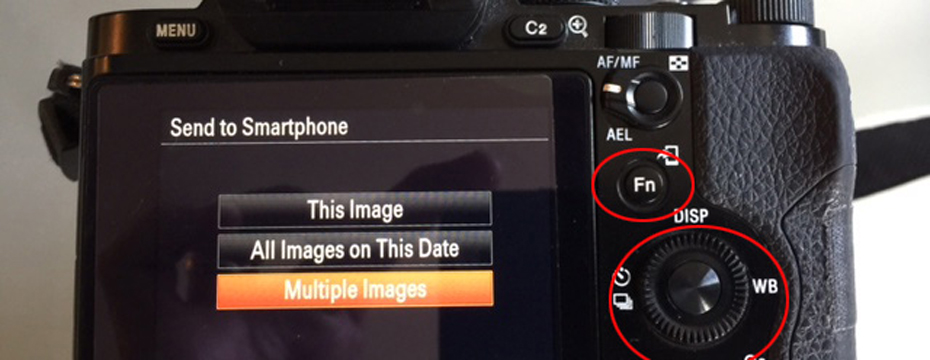
3. Press the Fn button to access the wireless transfer feature of the camera. The highlighted line allows you to transfer one image.
4. Press the Fn button to access the wireless transfer feature of the camera. Using the rear dial scroll to access Multiple Images if you would like to transfer more than one photograph.
5. A window shows the password for your wireless connection (you will have to enter this in the settings when first using the app on your phone).
6. Using the scroll wheel, move through the photographs, depressing the center button of the wheel to mark your selects (checkmark in box, at left).
7. Press the Menu button, scroll the wheel to the enter command, then press the center of the button to begin the download process.
8. Go to your Settings Menu on your iPhone
9. Look for the Sony camera on your wi-fi network (circled). Activate it by pressing the name.
10. Once the Camera network is checked you are connected to the camera.
11. Select the Sony PlayMemories App on your iPhone and launch it:
12. With the camera and phone properly linked, the PlayMemories will immediately begin to copy the photographs you have tagged (if multiples) or any individual photographs you wanted to send to the phone. If it does not connect, go back to Settings and switch the Wi-Fi settings off and on and repeat steps above to connect.
13. Now the photograph is copied to your camera roll and you can send it from the phone, or, as I like to do, I will enhance the photograph before posting using the PicTapGo app. I launch that from the main screen of my iPhone.
14. Select your Photograph from the Pic screen of PicTapGo (circled in red) and bring into the app for processing.
15. In the Tap section, you can determine the look and feel using filters that are pre-loaded AND ones that you can create and save, making it speedy to reproduce a look that you like. The interface gives you a real time view of what the changes will look like. You can also access the crop tool (in the Tap menu on the top menu bar)
16. I converted the image to B & W in the app. The slider underneath the photograph allows you to determine how much of the action/filters’ effect you see in the image.
17. Under the Go part of the app, I see an array of ways to share the photograph. I will often use the Instagram – Full style setting which shows the image in full aspect ratio rather than square.
18. Launch Instagram from the PicTapGo app.
19, The image is now brought into Instagram, and you can edit further, if you wish, or prepare to post it by hitting the Next button in upper right corner.
20. Caption & add hashtags to your photograph before posting.
21. Ready to upload, I also send to FB and Twitter in addition to Instagram. Press Share at the bottom to post at Instagram.
22. Success!! Your photograph is now online at Instagram for the world to see!!
I hope you find this Using Sony Wi-Fi with PlayMemories, PicTapGo & Instagram tutorial helpful to you! If you like this, I think you will like being on my email list where you’ll receive emails about tools, tips, techniques and inspiration. To sign up for that please go here: http://forms.aweber.com/form/91/1095951691.htm
Thanks for reading!
Paul
Please rate this story, and share it with your friends? [ratings]


